What is variable data printing (VDP)
Variable Data Printing (VDP) is how you turn structured data into thousands of print-ready visuals automatically. A single template + a dataset produces one output per record consistently, repeatably, and at scale.
In production systems, VDP is not a design problem. It’s a data → rendering pipeline. You validate inputs, map them to template variables, and generate outputs through a controlled, deterministic process.
This guide shows how to implement that pipeline end-to-end, from JSON templates and datasets to batch rendering, proofing, and print-ready exports.
Two properties that distinguish VDP from basic templating
1. Scale
VDP systems are designed to handle large batch sizes, typically ranging from hundreds to millions of outputs in a single run. This requires:
- Queue-based rendering systems
- Parallel processing across workers
- Efficient asset handling (fonts, images) Basic templating systems (e.g., generating a few PDFs via scripts) often break down at this scale due to performance bottlenecks, lack of orchestration, or missing retry mechanisms.
2. Determinism
Determinism ensures that: The same template version + the same input record always produces the exact same output. This is critical for:
- Auditability (e.g., compliance, billing records)
- Re-runs (recovering failed batches)
- Debugging inconsistencies Non-deterministic systems (e.g., relying on live APIs during rendering) can produce inconsistent outputs, which is unacceptable in production print workflows.
Production VDP pipeline: Bulk discount coupons with Polotno
Let’s walk through an end-to-end, production-grade VDP workflow for generating personalized discount coupons using Polotno. If you are evaluating Polotno as an embedded editor for your product, start with your search for a creative editor SDK ends here to understand the overall SDK surface area.
Using a simple customer list, we will create a single reusable coupon template and personalize it per recipient (for example, injecting first_name), then render final outputs in bulk with the operational checks needed for real-world runs.
Step 1: Collect and normalize data
Every VDP workflow begins with a dataset. This can come from:
- CRM exports (customer segmentation)
- CSV files (marketing campaigns)
- Product feeds (e-commerce catalogs) The key requirement is normalization: ensuring consistent field names and formats. For example, your dataset:
const dataset = [
  { first_name: 'Sarah', promo_code: 'SARAH20' },
  { first_name: 'James', promo_code: 'JAMES20' },
  { first_name: 'Priya', promo_code: 'PRIYA20' },
];
In real-world pipelines, this step includes:
- Standardizing field names (
firstName→first_name) - Cleaning null values
- Formatting dates and currency
- Ensuring encoding consistency (UTF-8 for multilingual support) Think of this as preparing a clean contract between data and design.
Step 2: Design the template (safe areas + variables)
Your Polotno template acts as the base blueprint.
const designJSON = {
  width: 800,
  height: 460,
  pages: [
    {
      background: '#161616',
      children: [
        {
          id: 'hero',
          type: 'image',
          x: 440, y: 0, width: 360, height: 460,
          src: 'https://images.unsplash.com/photo-1529139574466-a303027c1d8b?w=400&h=460&fit=crop',
        },
        {
          id: 'eyebrow',
          type: 'text',
          x: 48, y: 64, width: 360,
          text: 'EXCLUSIVE OFFER',
          fontSize: 11, fontFamily: 'IBM Plex Sans',
          fill: '#888888',
        },
        {
          id: 'h1',
          type: 'text',
          x: 48, y: 100, width: 360,
          text: '{{first_name}},',
          fontSize: 58, fontFamily: 'IBM Plex Sans',
          fill: '#ffffff',
        },
        {
          id: 'h2',
          type: 'text',
          x: 48, y: 168, width: 360,
          text: 'your offer is here.',
          fontSize: 58, fontFamily: 'IBM Plex Sans',
          fill: '#ffffff',
        },
        {
          id: 'code-label',
          type: 'text',
          x: 48, y: 328, width: 360,
          text: 'USE CODE  {{promo_code}}',
          fontSize: 17, fontFamily: 'IBM Plex Sans',
          fill: '#ffffff',
        },
        {
          id: 'fine',
          type: 'text',
          x: 48, y: 362, width: 360,
          text: '20% off your next order  ·  Valid through 30 Apr 2026',
          fontSize: 12, fontFamily: 'IBM Plex Sans',
          fill: '#666666',
        },
      ],
    },
  ],
};
Key best practices:
- Define safe areas (avoid trimming issues in print)
- Maintain bleed margins (for professional printing)
- Use variable placeholders like
first_name,promo_codeThese placeholders are the bridge between static design and dynamic data. If you need to make the editor match your product UI, see Customizations for side panel, toolbar, workspace, and export hooks.
Step 3: Map fields to variables + formatting rules
In your implementation:
const replaceVariables = (template, data) => {
  let json = JSON.stringify(template);

  Object.keys(data).forEach((key) => {
    const regex = new RegExp(`{{${key}}}`, 'g');
    json = json.replace(regex, data[key]);
  });

  return JSON.parse(json);
};
In production systems, this step often includes:
- Date formatting (2026-04-01 → April 1, 2026)
- Currency formatting (1000 → ₹1,000)
- Text transformations (uppercase, title case)
- Conditional fallbacks ({{name || "Customer"}}) This ensures outputs are personalized, polished, and consistent.
Step 4: Proofing (single + edge cases)
Before scaling to thousands of outputs, always validate a few records:
- Normal record → “Sarah”
- Edge cases:
- Very long names
- Missing fields
- Non-Latin text (e.g., Hindi, Arabic)
In your setup, you can test by running:
await store.loadJSON(personalizedTemplate);This step prevents:
- Text overflow
- Broken layouts
- Missing assets Think of it as unit testing for design.
Step 5: Preflight validations
Before batch rendering, run automated checks:
- Schema validation (all required fields present)
- Asset availability (images/URLs accessible)
- Font coverage (supports all characters)
- Resolution checks (print-ready DPI) While your current implementation is lightweight, production pipelines typically include:
- Asset preloading
- CDN validation
- Font fallback strategies Skipping this step can result in thousands of broken outputs so it’s critical.
Step 6: Batch rendering
const generateVDP = async () => {
  const baseTemplate = store.toJSON();

  for (const record of dataset) {
    const personalizedTemplate = replaceVariables(baseTemplate, record);

    await store.loadJSON(personalizedTemplate);

    await new Promise((resolve) => setTimeout(resolve, 200));

    await store.saveAsPDF({
      fileName: `${record.first_name}.pdf`,
    });

    await store.waitLoading();
  }

  await store.loadJSON(baseTemplate);
};
Within your floating div tag, add the following code, to display the Generate VDP PDFs.
<button onClick={generateVDP}>Generate VDP PDFs</button>What’s happening here:
- Clone base template
- Inject data
- Render in canvas
- Export as PDF
- Repeat for each record In production, this evolves into:
- Queue-based processing
- Parallel rendering workers
- Retry mechanisms for failed jobs
- Idempotency (avoid duplicate outputs) Your current loop is a perfect single-threaded prototype of a scalable system.
Step 7: Packaging and delivery
Once rendering is complete, outputs must be organized for downstream use. Typical practices: File naming conventions:
Sarah.pdfJames.pdfPriya.pdfManifest file (metadata):
{
  "total": 3,
  "files": ["Sarah.pdf", "James.pdf", "Priya.pdf"]
}
Delivery options:
- Upload to S3 / GCP Storage
- Send to print vendors
- Provide download bundles (ZIP)
Putting it all together
Your current Polotno setup already implements the core VDP engine:
- JSON-based templates
- Variable substitution
- Iterative rendering
- PDF export
Start your app using
npm start. Once your React app loads, open your browser, and open your development server. You should see the Polotno editor loaded with the split-panel promotional mailer, black background on the left, editorial image on the right, and the{{first_name}}and{{promo_code}}placeholders visible in the canvas.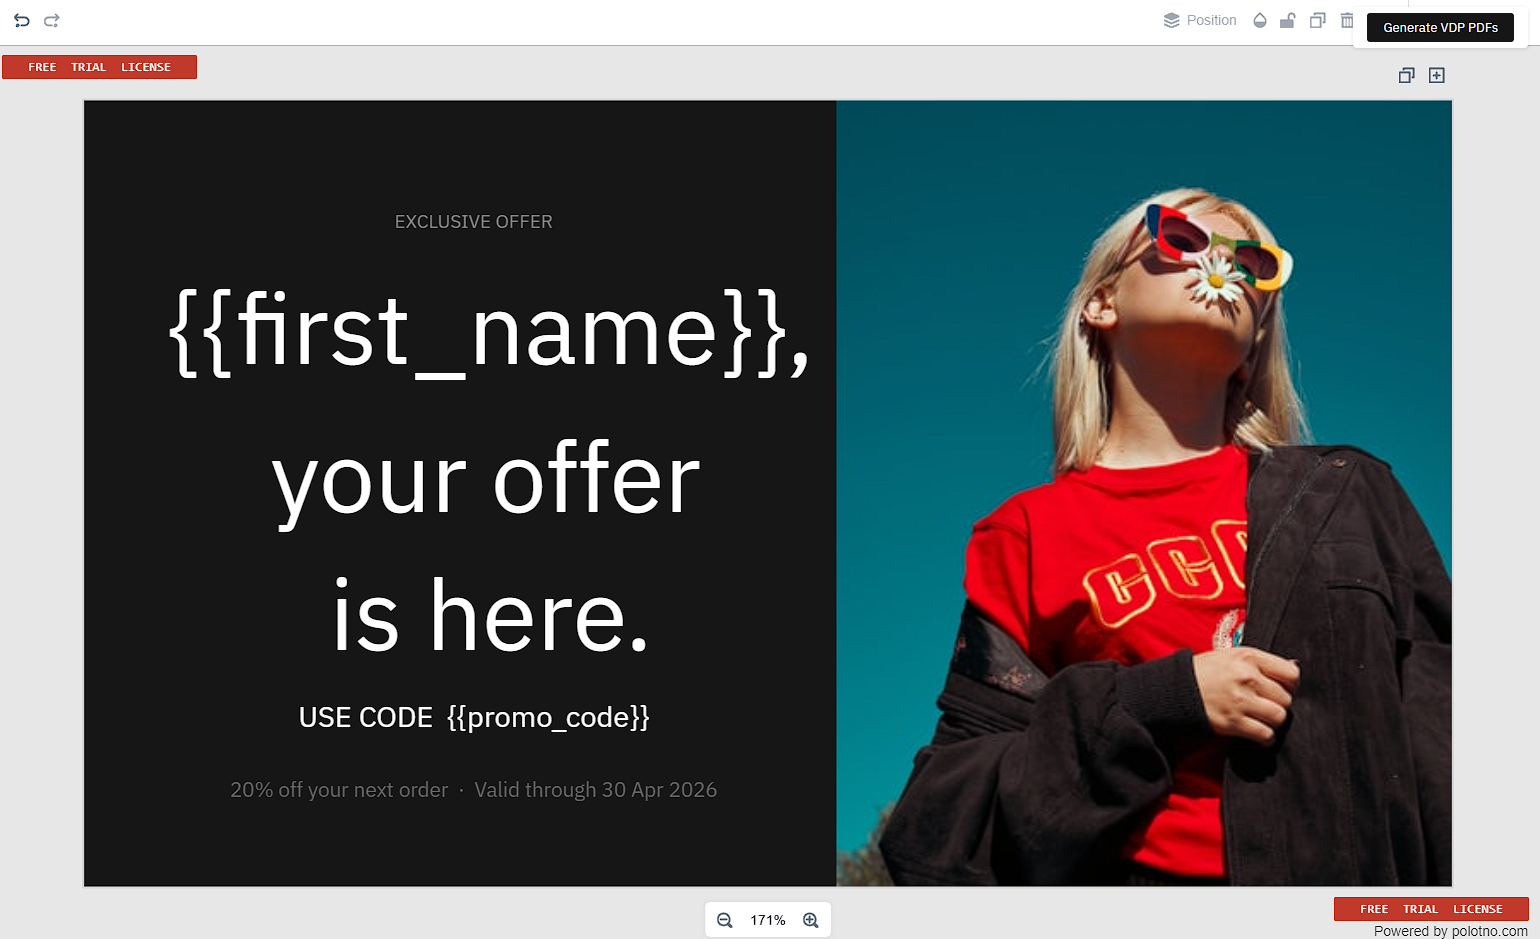 Click on the Generate VDP PDFs button. The pipeline will iterate through all three records, personalise the template for each, and trigger a browser download per record.
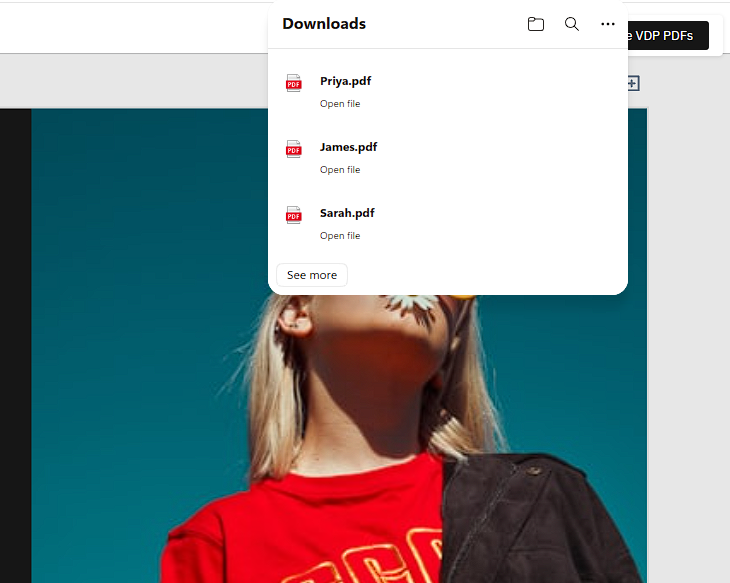 Each file is independent. The content will differ for every record based on the dataset.
Sarah.pdf
Record: { first_name: 'Sarah', promo_code: 'SARAH20' }
The headline reads "Sarah, your offer is here." and the promo code block shows USE CODE SARAH20.

James.pdf
Record: { first_name: 'James', promo_code: 'JAMES20' }
The headline and promo code update to reflect James's record. The layout, image, and typography remain identical. Only the variable fields change.

Priya.pdf
Record: { first_name: 'Priya', promo_code: 'PRIYA20' }
Priya.pdf confirms that the pipeline is stateless between iterations. The base template is restored to its original state after each export, so this output is rendered from a clean slate, not derived from the previous two.

System architecture for VDP pipeline
A production VDP system has four components:
- Template layer JSON-based layout with variables and constraints
- Data layer CSV / database / API providing normalized records
- Rendering engine Executes template + data → outputs (PDF/image)
- Orchestration layer
Queue, retries, batching, and job tracking
Minimal flow:
Dataset → Mapping → Render Engine → Output
What qualifies as a variable?
VDP supports multiple categories of dynamic content, each with different constraints:
- **Identity fields: **Names, addresses, company details. High variability; prone to overflow and formatting issues.
- **Commercial data: **Offers, pricing, SKUs. Often requires formatting (currency, rounding) and conditional logic.
- **Machine-readable codes: **QR codes, barcodes. Must be generated per record and validated for scan reliability.
- **Media assets: **Product images or personalized visuals. Require resolution checks, cropping rules, and fallback handling.
- **Localization: **Language, currency, date formats. Introduces layout variability due to text expansion and font coverage.
Typical outputs
A production VDP pipeline produces outputs that downstream systems (print vendors, fulfillment, analytics, and audit logs) can consume reliably.
Per-record PDFs. One file per record (for example, user_123.pdf). This is the most flexible format for reprints, individualized delivery, and post-run troubleshooting.
Merged PDF. A single combined document containing all records, optimized for bulk printing and imposition workflows.
Manifest file. A CSV or JSON control file that maps record IDs to output filenames, statuses, and error metadata. The manifest is what enables traceability and safe partial reruns if a subset of records fails mid-batch.
When do you need VDP vs regular templates?
Use VDP when
- Layout is fixed, data varies
- Example: postcard where only recipient and offer change
- Volume exceeds manual feasibility
- ~100+ outputs is usually the tipping point
- Personalization impacts outcomes
- Direct mail with personalized offers or URLs
- You need auditability
- Ability to trace: which record generated which file
- Proofing must scale
- You cannot manually check every output
Avoid VDP when
- Design changes per output
- If layout is not consistent, VDP adds friction
- Low volume (<20–50 outputs)
- Manual editing is often faster
- Weak data dependency
- If personalization is trivial (e.g., only a name)
- No need for reproducibility
- If outputs don’t need to be regenerated exactly
Common triggers (with practical context)
- **Direct mail campaigns: **50,000 recipients, each with a unique offer + QR → requires automation, tracking, and proofing.
- **Event badges: **2,000 attendees → name, role, company, barcode → needs batch generation + scan reliability.
- **Localized collateral: **Same brochure in 12 languages → layout stable, text expands/contracts.
- **Product catalogs: **5,000 SKUs → price + image + description → dataset-driven rendering.
Core concepts used consistently in production
1. Template
A template is a structured layout definition, not just a visual design. It separates fixed elements, backgrounds, branding, structural chrome, from variable placeholders that will be filled at render time. In scalable systems, templates are stored as versioned JSON schemas rather than binary design files, which makes them diffable, auditable, and programmable. Each placeholder should carry an explicit constraint: maximum lines, minimum font size, crop behavior, because the template cannot know in advance how long the data will be.
2. Dataset
A dataset is a normalized, structured input source where every record shares the same field schema. It can arrive as a CSV export, a CRM or ERP query, or a real-time API feed. The format matters less than the consistency. If one record has first_name and another has name, the merge step will silently produce blank output, which is one of the most common failure modes in production pipelines.
3. Record
A record is the atomic unit of processing in a VDP pipeline: one record in produces exactly one output file. This 1:1 relationship is what makes the system deterministic and traceable. Example:
{
  "first_name": "Sarah",
  "promo_code": "SARAH20"
}
4. Variables
Variables are named bindings that connect a dataset field to a specific element in the template. At render time, the engine walks the template JSON and replaces each token with the corresponding value from the current record. The binding is intentionally loose. The same {{promo_code}} token can drive a text box in one template and a QR input in another, with no change to the dataset.
Common bindings:
{{first_name}} → text element{{promo_code}} → text element{{qr_url}} → QR code generator{{image_url}} → image element
5. Rules
Rules control how data is rendered, not just what is rendered. Without a rule layer, raw data lands in the template unformatted. Dates appear as ISO strings, prices have no currency symbol, and a null field leaves a visible blank in the design. A robust rule layer sits between the dataset and the template, transforming values before they're merged. Types of rules:
- Formatting: dates to
DD/MM/YYYY, numbers to₹1,200 - Conditional logic: show an offer badge only if
offer != null - Fallbacks: substitute a placeholder image when
image_urlis missing - Transformations: uppercase, title case, string truncation
6. Proofing
Proofing is a controlled validation step before batch execution, the last checkpoint between your pipeline and a print run you can't take back. It combines visual inspection (does the layout hold across different data lengths?) with functional validation (does the QR code scan? does the text fit in the box?). Most production issues are caught here, which is why proofing a representative sample before committing to a 10,000-record batch is non-negotiable.
7. Render job
A render job is the discrete execution unit of the pipeline, scoped to a specific template version, dataset reference, and output configuration. Treating jobs as first-class tracked entities, with explicit states of pending, running, failed, and completed, is what enables partial reruns, audit trails, and retry logic. Without this structure, a mid-batch failure means reprocessing everything from scratch.
Using LLMs in VDP pipelines (generation + variables)
In modern systems, VDP pipelines often combine structured data with generated content. Instead of storing all final values in the dataset, some fields are created dynamically before rendering.
Where LLMs fit
LLMs are used in the data preparation layer, not the rendering layer. Example:
const enrichedRecord = {
  ...data,
  headline: await generateCopy({
    name: data.name,
    segment: data.segment,
  }),
};
VDP pipelines require deterministic outputs, and LLMs are inherently non-deterministic. To resolve this issue:
- Generate content before rendering
- Store generated fields in dataset
- Run rendering as a deterministic process
Recommended Pattern:
Raw Data → LLM Enrichment → Validated Dataset → VDP Rendering → Output.
Template design for print (practical constraints)
Designing a VDP template is not just about aesthetics. It’s about predictability under variation. Every variable field introduces uncertainty, and your template must be resilient enough to handle thousands of data combinations without breaking.
Sizes and units (trim, bleed, safe margins)
Every print design starts with physical dimensions. Trim Size → Final cut size (e.g., A4, postcard, flyer) Bleed Area → Extra space beyond trim (typically 3mm) to avoid white edges after cutting Safe Margin → Inner padding where critical content must stay In your Polotno setup:
const designJSON = {
  width: 800,
  height: 600,
};
These are pixel dimensions, but for print workflows:
- Define a fixed DPI (usually 300 DPI)
- Convert units properly (mm ↔ pixels) Best Practice:
- Never place variable text near edges
- Keep all dynamic elements within safe margins
- Extend background elements into bleed This ensures your output remains print-safe regardless of trimming variance.
Text behavior (handling variable content)
Text fields are the most common failure point in VDP. For each variable field (e.g., {{name}}, {{offer}}), define a strict behavior policy:
- Truncation
- Cut text after a fixed length
- Example: "Alexander Johnson" → "Alexander J..."
- Auto-resize
- Dynamically reduce font size to fit container
- Risk: inconsistent visual hierarchy
- Multiline wrapping
- Allow text to flow across lines
- Requires vertical spacing flexibility Recommendation: Define behavior per field, not globally. Example:
- name → multiline (2 lines max)
- offer → fixed size + truncate
- address → multiline (3–4 lines)
Font policy (coverage + fallbacks)
Fonts are often overlooked, but they are critical in VDP. You must define:
- Primary fonts (brand-approved)
- Fallback fonts (for unsupported characters)
- Glyph coverage rules For the Polotno-side configuration details (uploads, translations, fonts, presets), see Editor configuration. If your dataset includes Hindi, or Arabic texts and if your font doesn't support these glyphs, the text will either break or disappear. Best practices:
- Use fonts with broad Unicode support
- Define fallback chains
- Test multilingual samples during proofing
Image policy (consistency at scale)
Images introduce variability in both dimensions and composition. Define strict rules:
- Aspect Ratio
- Example: 1:1 (square), 4:3, 16:9
- Reject or transform images that don’t match
- Minimum Resolution
- For print: typically 300 DPI equivalent
- Low-res images → blurry outputs
- Crop Strategy
- Cover (fill + crop) → consistent layout, possible cropping
- Contain (fit inside) → no cropping, may leave empty space
- Smart crop (face-aware, focal point) → advanced pipelines
Localization (designing for language expansion)
One of the most overlooked challenges in VDP is text expansion across languages. Example:
- English: “50% OFF”
- German: “50% RABATT AUF ALLE PRODUKTE” (much longer) If your design is tightly constrained, localization will break it. Key Guidelines:
- Reserve extra horizontal space for text fields
- Avoid hard-coded line breaks (\n)
- Prefer flexible containers over fixed-width text boxes
- Test with longest expected strings
Data merge and rules
To ensure consistency, scalability, and correctness, you must define how data is mapped, transformed, validated, and rendered.
Field mapping patterns
Not all fields are mapped directly. In production pipelines, you’ll encounter multiple mapping strategies:
1. Direct mapping
The simplest case: 1:1 substitution.
{{first_name}} → "Sarah"
{{promo_code}} → "SARAH20"
2. Composed fields
Sometimes, fields must be constructed dynamically.
{{full_name}} = {{first_name}} + " " + {{last_name}}Example:
const fullName = `${data.firstName} ${data.lastName}`;3. Formatted fields
Raw data is rarely presentation-ready.
{{date}} → "2026-04-01" → "April 1, 2026"
{{price}} → 1000 → "₹1,000"
This requires formatting logic:
const formattedPrice = `₹${data.price.toLocaleString('en-IN')}`;4. Lookup fields
Data enrichment using external mappings.
SKU → Price
SKU → Product Image
User ID → Segment
Example:
const priceMap = {
  SKU123: 499,
  SKU456: 999,
};

const price = priceMap[data.sku];
Conditional logic
VDP templates must adapt dynamically based on data.
1. Conditional visibility
Hide elements when data is missing:
if (!data.offer) {
  element.visible = false;
}
Use cases:
- Optional fields (e.g., discount badge)
- Missing images
- Incomplete records
2. Segment-based variations
Switch content based on audience segments:
IF segment = "premium" → show "Exclusive Offer"
ELSE → show "Standard Offer"
Example:
const offerText =
  data.segment === 'premium'
    ? 'Exclusive 30% OFF'
    : 'Flat 10% OFF';
3. Missing and invalid data handling
No dataset is perfect. You must define how your system behaves when data is missing or invalid.
- Defaults
{{name}} → "Customer" (if null)
const name = data.name || 'Customer';- Placeholders
Fallback values for visibility during debugging:
{{image}} → "image-not-found.png" - Soft Fail vs Hard Fail Define failure strategy clearly:
- Soft Fail (continue rendering)
- Missing optional fields
- Minor formatting issues
- Hard Fail (stop rendering)
- Missing required fields (e.g., name, address)
- Critical asset failures Example:
if (!data.name) {
  throw new Error('Missing required field: name');
}
Proofing and QA at scale
Proofing is the last control layer before batch execution. At scale, it must combine automated checks with targeted human review.
Preflight checklist
Validate before rendering:
- Required fields are present and correctly typed
- Fonts load and support all characters
- Images are accessible and meet resolution thresholds
- QR/barcodes generate and are scannable
- No text overflow beyond defined bounds
Sampling strategy
Avoid reviewing every record:
- First 10–20 records (baseline sanity check)
- Edge buckets (long names, missing data, non-Latin text)
- Random 1–2% sample (detect unexpected issues)
- Automated validation*
Codify common failures
- Overflow detection (text exceeds container)
- Minimum font size (e.g., ≥ 8pt)
- Image resolution (e.g., ≥ 300 DPI equivalent)
Human approval
Define explicitly:
- Who signs off (designer, QA, ops)
- What qualifies as “print-ready”
- Where proofs are stored (e.g., versioned storage with job ID)
Rendering options (and when to use each)
Choose rendering mode based on volume, control, and latency requirements.
Client-side rendering
Client-side rendering runs entirely in the browser and requires no backend infrastructure, making it the fastest path from template edit to visible output. If you want background on why a canvas-based editor architecture is a good fit for interactive rendering, see HTML canvas image editor. It integrates naturally with an embedded editor like Polotno and is well-suited to previews, approval flows, and low-volume exports where an operator is present. Browser memory limits and single-threaded execution make it impractical for large batches or templates with many heavy image assets.
Self-hosted rendering
Self-hosted rendering gives you complete control over hardware, concurrency, network boundaries, and data handling, making it the correct choice for high-volume jobs, workloads that involve PII, or clients with strict data-residency requirements. If you are embedding Polotno in a SaaS product and need it to feel native, the same control also matters for branding. See The power of a white-label image editor on your platform for the product and UX angle. You can tune the environment precisely to your template's asset profile and scale workers horizontally as batch sizes grow. The tradeoff is operational overhead: you own the infrastructure, the scaling logic, and the failure recovery.
Cloud rendering
Cloud rendering offloads execution to an elastic managed service that scales automatically with demand, which makes it the lowest-friction option for variable or unpredictable job sizes. It eliminates infrastructure operations entirely, no workers to provision, no queues to manage, and handles burst throughput cleanly. The primary tradeoffs are cost variability at high volume and reduced control over the execution environment, which matters when your templates reference private assets or your dataset contains sensitive data.
Print-ready output specifics
This stage ensures outputs are compatible with downstream print systems.
Output packaging
- Per-record PDFs: easier tracking, reprints, and distribution
- Merged PDF: optimized for bulk printing and imposition
- Always include a manifest (CSV/JSON) mapping record → filename → status
Bleed and crop marks
- Define bleed (e.g., 3mm) at template level
- Add crop marks either:
- During export (preferred), or
- In downstream print workflows
- Avoid duplicating bleed handling across systems
Font embedding
- Embed all fonts in PDFs
- Define fallback fonts for missing glyphs
- Prevent printer-side substitution (common failure source)
Color workflow
- If designing in RGB, explicitly define RGB → CMYK conversion step
- Document ICC profiles used to avoid color inconsistencies
Performance and scalability
VDP performance depends on throughput, resource usage, and failure handling.
Queue model
A queue-based model decouples job submission from job execution, letting your system accept more records than it can render in real time without dropping work. Define batch sizes in the range of 500–2,000 records per job and set concurrency limits based on available CPU and memory. Without backpressure, a mechanism to slow intake when the queue grows too deep, a spike in job submissions can exhaust resources and trigger cascading failures across the entire pipeline.
Caching
Fonts and images are the most expensive assets to fetch per record, and in most batches they're shared across every output. Fetching them once and holding them in memory, rather than re-downloading on each iteration, is one of the highest-leverage performance improvements available in a VDP pipeline. Preload common assets before the render loop begins so the first record pays the same cost as the last.
Retries and idempotency
Transient failures, network timeouts, asset fetch errors, brief service interruptions, are inevitable when processing thousands of records. Implement retry logic with an exponential backoff strategy for these cases, and assign idempotent job keys to each record so that retrying never produces a duplicate output. Idempotency also enables safe partial reruns: if 200 records fail mid-batch, you can reprocess only those without regenerating the 9,800 that succeeded.
Cost model
The primary cost drivers in a VDP pipeline are render time per record, asset fetch frequency, output storage, and bandwidth for transferring both assets in and finished files out. Caching shared assets aggressively reduces fetch frequency and bandwidth costs simultaneously. At scale, even a 50ms reduction in per-record render time saves hours of compute across a large batch. Profiling the render loop early pays for itself quickly.
Security and compliance (PII)
VDP pipelines often process personally identifiable information (PII).
PII handling
VDP datasets routinely contain personally identifiable information, names, addresses, contact details, which means access must be scoped as narrowly as possible. Apply the principle of least privilege: only the rendering worker should have read access to the dataset, and that access should be limited to the current job's duration. Avoid logging sensitive fields at any stage of the pipeline, and ensure all data is encrypted in transit (TLS) and at rest.
Data retention
Define an explicit lifecycle for every artifact the pipeline produces. Input datasets are typically needed only for the duration of the render job and should be deleted or archived immediately afterward. Output PDFs should carry an expiry policy, 30 days is a common default, with automated cleanup to prevent sensitive files from accumulating in storage indefinitely. Treating retention as a first-class concern, rather than an afterthought, is what keeps a pipeline compliant as it scales.
Isolation
In self-hosted environments, you control the full network boundary. No data leaves your infrastructure unless you explicitly allow it. In cloud environments, enforce strict network egress rules and restrict what the rendering worker can reach beyond the assets it needs. Regardless of deployment model, maintain audit logs for all dataset access and job execution events to support compliance review and incident response.
Common VDP use cases
Direct mail postcards
Generate thousands of postcards with personalized address, offer, and QR code per recipient.
Event badges and tickets
Produce attendee badges with name, role, and barcode for entry validation.
Real estate flyers
Create per-listing flyers with property details, agent info, and multiple images.
Menus and catalog sheets
Render SKU-based sheets with pricing and localized descriptions across regions.
Certificates and diplomas
Generate certificates with recipient name, course details, date, and unique verification code.
Alternatives and tradeoffs
InDesign scripting
Pros: mature print tooling, precise layout control Cons: complex automation, difficult to scale, manual ops overhead
HTML-to-PDF stacks
Pros: flexible, web-native workflows Cons: inconsistent layout rendering, font and print precision issues
Hosted render APIs
Pros: quick setup, minimal infrastructure Cons: limited control over templates, data handling, and rendering behavior
Tradeoff summary
Every VDP stack is a trade between control and convenience, print precision and implementation flexibility, and operational overhead versus scalable throughput.
FAQ
How do I generate 10,000 personalized PDFs safely?
Use a queue-based rendering system that processes records in bounded batches rather than a single blocking loop. Run preflight validation across the full dataset before any rendering begins. Catching schema errors and broken asset URLs early prevents wasted compute on a batch that was doomed to fail. Implement parallel workers to reduce wall-clock time, tune concurrency against available memory, and add retry logic with idempotent job keys so failed records can be reprocessed without duplicating successful ones.
Can I output one merged PDF instead of 10,000 files?
Yes. The standard approach is to render per-record PDFs first, then concatenate them into a single document using a PDF merge library. This preserves the ability to reprint or audit individual records independently, while still producing a single file optimized for bulk printing and imposition workflows. Never skip the per-record step and try to merge on the fly. It removes your ability to recover from partial failures.
How do I handle long names/addresses without breaking layout?
Define a behavior policy per variable field rather than applying a global rule. Long fields like names and addresses benefit from multi-line wrapping with an explicit maximum line count, while short fields like offer codes or SKUs should truncate at a fixed character limit. Set a minimum font size threshold if you use auto-resize, to prevent text from shrinking below legibility, and test all policies against your longest expected strings during proofing, not after.
Can I generate QR codes and barcodes per record?
Yes. Generate the QR or barcode SVG dynamically within each iteration of the render loop, using the record's unique identifier, URL, or SKU as the input value. Validate scannability programmatically as part of your preflight checks. A visually correct barcode that fails to decode is a silent failure that is difficult to detect at scale and costly to reprint.
How do I localize into many languages and handle font coverage?
Start with UTF-8 encoding throughout: data files, templates, and output PDFs. Select fonts with broad Unicode coverage for any field that may contain non-Latin text, and define explicit fallback chains for glyphs your primary font doesn't support. Design templates with extra horizontal space in text containers: German and Finnish regularly run 30–40% longer than their English equivalents, and a tightly composed layout will break visibly under localization.
What are the top failure modes in VDP pipelines?
The most common failures are missing or inaccessible image assets, font glyph gaps that silently produce blank or corrupted text, and text overflow when variable content is longer than the template anticipated. A fourth category, non-deterministic rendering caused by live external dependencies like dynamic APIs or CDN-served fonts that change between runs, is harder to detect because outputs look correct individually but diverge across batches. All four are preventable with thorough preflight validation and a stateless, asset-preloaded rendering architecture.
Glossary
- VDP: Variable Data Printing, batch generation of personalized outputs from a template + dataset
- Record: One row of input data that produces one output
- Bleed: Extra design area beyond trim to prevent white edges
- Trim: Final cut size of the printed piece
- Safe Area: Inner margin where critical content must stay
- Crop Marks: Marks indicating where to cut the printed sheet
- Preflight: Validation step before rendering
- Imposition: Arranging pages for efficient printing
- Font Embedding: Including fonts inside PDF to avoid substitution